
Versatile Revit User Interface Guide and Tips for New Users in 2025
- December 7, 2024
In April 2024, Autodesk Revit 2025 was launched. It has been upgraded with several new features. We are going to see an overview of the Revit User Interface, how it looks, and how a newbie can get accustomed to this software. Autodesk Revit is obviously a versatile Building Information Modeling (BIM) software and is widely used in the architecture, engineering, and construction industries. Personnel without an engineering background may find it difficult to learn. Beginners have to be highly motivated and dedicated if they intend to become experts at Revit. This guide will provide you with the basic essential components of the Revit interface, helping you navigate effectively and efficiently.
Understanding the Revit User Interface
The Revit interface is designed intuitively following logical order and common sense, yet it can be overwhelming for new users at first hand. Familiarizing yourself with its key components will take time to adapt and enhance your workflow and productivity.
The essential features of Revit are given below:
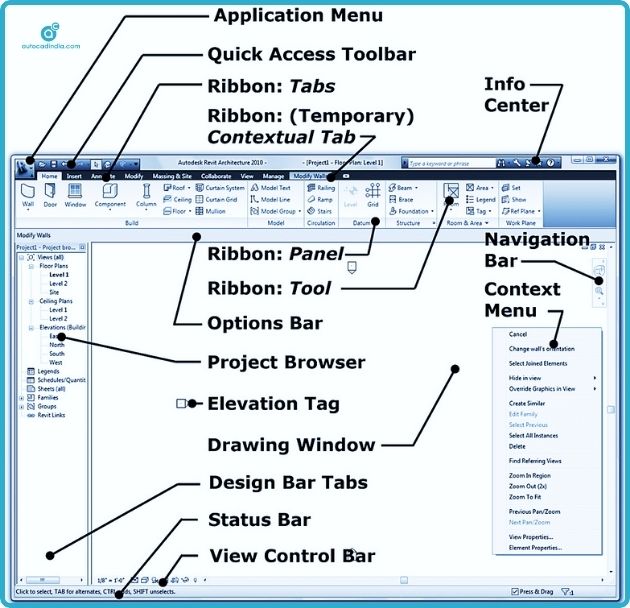
1. File Menu
2. Quick Access Toolbar
3. Ribbon
4. View tabs
5. Options Bar
6. Context Tab
7. Info Center
8. View Area
9. Status Bar
10. View Control Bar
11. Project Browser
12. Properties
1. File Menu
You can find the ‘Application or File Menu’ in the top-left corner of the Revit User Interface. This menu is essential for managing your projects and accessing various functionalities.

It provides access to file-related commands such as:
- New Project
- Open Project
- Save and Save As
- Print Options
- Export Options
2. Quick Access Toolbar
The Quick Access Toolbar is placed/situated above the Ribbon and allows users to customize commands that are frequently used for quick access. You can add or remove buttons by right-clicking on any command in the Ribbon and selecting “Add to Quick Access Toolbar”.
Common commands to consider adding include:
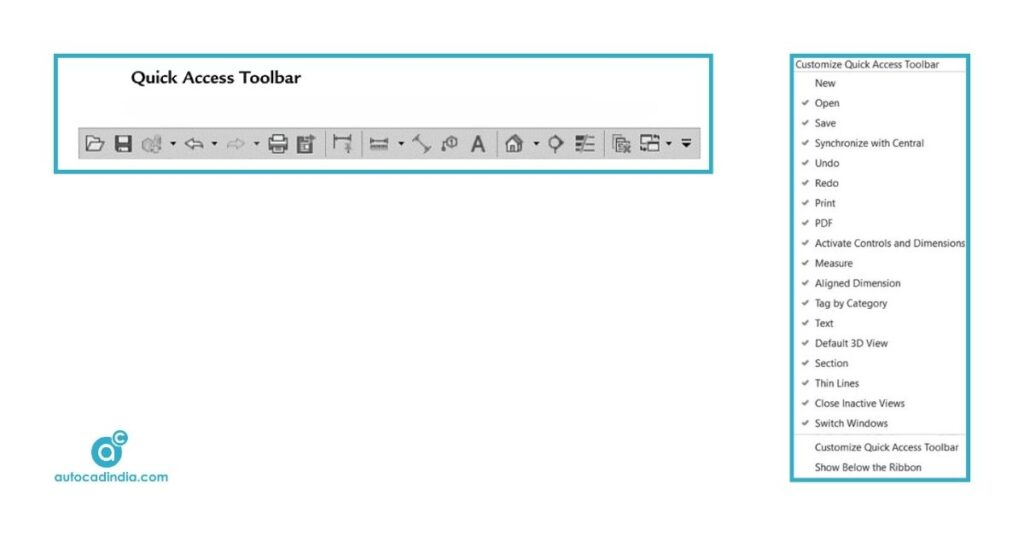
Common commands to consider adding include:
- At the end of Quick Access Toolbar, you will see an
Arrow, click it and a list of options will open. - From the list, you can add or remove or modify
commands.
3. The Ribbon
The ‘Ribbon’ is a prominent feature of the Revit interface, organized into tabs that group related tools and commands. It has two parts Tabs and Panels.
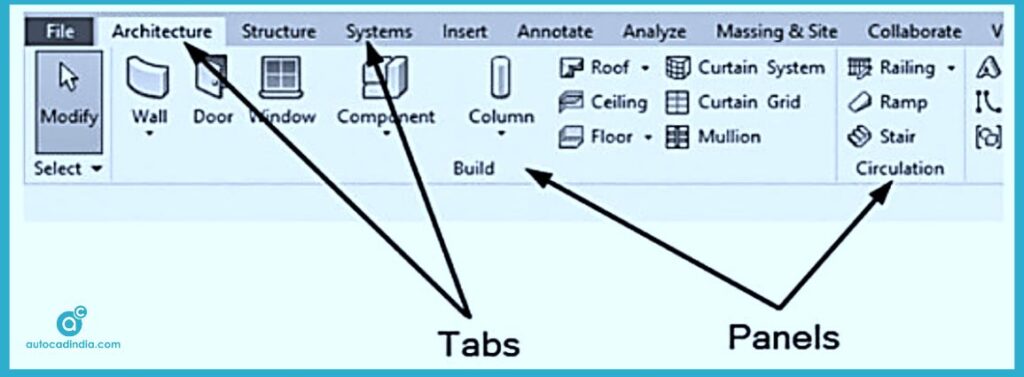
Each tab contains panels with specific functionalities:
- Home Tab: This tab contains tools for creating and modifying elements like walls, doors, and windows.
- Insert Tab: It provides options for importing files, linking models, and managing views.
- Annotate Tab: The Annotation Tab includes tools for adding dimensions, text notes, and tags.
- View Tab: View Tab is simply, offers commands for managing views and visibility settings.
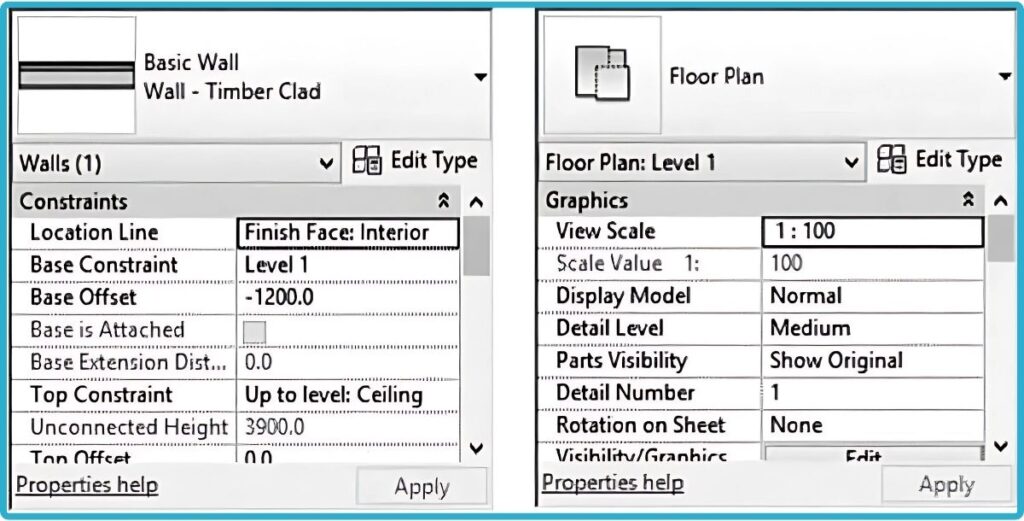
4. Properties Palette
Properties Palette is important feature for managing your project components. At the top left of the View Area, you will find the Properties palette (You can dock it anywhere else in the Revit Interface). Check the following figure of two examples. The first one shows the properties of a wall, and the second one shows the properties of the current floorplan:
5. Project Browser
The Project Browser provides a hierarchical view of all views, sheets, and families in your project. Everything related to your project will be shown in Project browser. It helps in organizing and navigating through different project elements.
- Floor plans
- Ceiling Plan
- Schedules and Quantities
- 3d rendering
6. Status Bar
The Status Bar provides real-time feedback on commands and actions. It is located at the bottom of the interface. It also displays the next step after you start a command and information about the current state of your project. For example, while you are in the Wall command, you will see at the left of the status bar “Click to enter wall start point.”
- The second part is the Work set part (advanced feature).
- The third part is the Design Options part (advanced feature).
- The rest are buttons for selecting elements and filters.
7. Options Bar
When you start a new command or select an element, your options bar filled with information to help you finish your task correctly. Below the ribbon, you can see the Options Bar. It is shown in Modify tab that shows different options like height location site, modifying alignment etc. dependent on the selected element.
2. Navigation Methods
Navigating through your model effectively is crucial for successful project management in Revit.
The following navigation tools are accessible from the navigation bar:
- Zoom.
- View Cube
- Steering Wheels.
- Pan Active View.
- 3D Mouse.
2.1 Zooming and Panning
To zoom in or out of your view:
- Scroll through your mouse to zoom.
- Hold down the Shift key and drag with the middle mouse button to pan across the view.
2.2 Using the View Cube
The ‘View Cube’ navigation tool provides a 3D perspective of your model. It is located in the upper-right corner of the drawing area. You can click on different faces or corners of the cube to change your view orientation quickly.
2.3 Keyboard Shortcuts
Keyboard shortcuts always speed up your navigation process in Revit. Here are some essential shortcuts:
| Shortcut Key | Command |
| Z + Z | Zoom In |
| Z + Shift + Z | Zoom Out |
| Shift + Middle Mouse Button | Pan |
| Shift + Ctrl + Middle Mouse Button | Rotate View |
3. Organizing Projects
Effective project organization is vital for managing complex models in Revit. Following features are used for organizing a Projects. Let’s see in brief:
3.1. Project Browser
Everything related to your project will be found in the Project Browser. The ‘Project Browser’ is for displaying all views, sheets, families, and other elements within your project. It allows you to navigate between different views easily and manage your project structure efficiently.
You will find the following:
- All views (floor plans, ceiling plans, sections, elevations, 3D, rendering, legends, etc.)
- Schedules and Quantities
- Sheets
- Loaded families
- Created groups
- The name of the current view will be bold compared to the other views.
3.2. View Control Bar
In the Revit User Interface, this bar is located at the bottom of view area, above the status bar:

In this bar, you can control the scale of the view. Use the Detail Level button to control the view; you have three choices:
- Coarse
- Medium
- Fine
To keep your Project Browser organized:
- Use folders to categorize views.
- Rename views descriptively.
- Delete unused views to reduce clutter.
- Creating Views:
- Go to the View tab in the Ribbon to create a new view,
- Right-click on “Views” in the Project Browser.
- Select “New” and choose from options like “Floor Plan” or “Section.” or Elevation.
- Name your view appropriately for easy identification. This allows you to focus on specific areas of your project.
- Managing Views:
Managing views effectively allows you to focus on specific elements of your project without distraction. Use the Project Browser to organize your views into folders for better management. You can also duplicate views for different purposes without altering the original.
- Adjusting View Properties:
Right-click on a view in the Project Browser and select “View Properties” to modify settings such as scale, visibility graphics, and detail levels.
3.3 Using Filters
Filters enhance visibility in complex projects by controlling displayed elements based on specific criteria, such as category or phase. To apply filters:
- Access the Visibility/Graphics settings (shortcut: VG).
- Select the “Filters” tab.
- Create a new filter or modify existing ones according to your needs.
4. Working with Content
Revit families are used as building blocks for creating models. Understanding how to work with content effectively is essential for beginners.
Families are pre-defined components that can be implementeed into your project (e.g., doors, windows, furniture). To load a family:
1. Go to the Insert tab.
2. Click on “Load Family.”
3. Navigate to the desired family file and select it. Once loaded, families can be placed into your model using appropriate tools from the Home tab.
4.2 Loading Additional Content
Expanding your library of families can enhance your design capabilities significantly. Autodesk provides a wealth of additional content through its online resources, including:
- Autodesk Seek
- BIM object
- Manufacturer websites
Regularly updating your content library ensures that you have access to the latest components available in the market.
5. Managing Your Project Model
Let’s discuss about the tools that helps to conduct Proper management of your project model. For maintaining organization and efficiency throughout the design process, managing project model is absolutely necessary.
5.1 Best Practices for Model Management
To keep your Revit model organized:
- Use consistent naming conventions for views and elements.
- Regularly purge unused families from your project.
- Create backup copies frequently to prevent data loss.
Following these best practices helps maintain a clean and manageable project environment.
5.2 Collaboration Tools in Revit
Revit offers several collaboration tools that facilitate teamwork among project stakeholders:
- Work-sharing: Allows multiple users to work on a single model simultaneously by dividing it into manageable sections.
- Central Models: A central file serves as a master copy that team members can sync their changes with regularly.
Closing
Proper dedication and regular practice can make anyone help to learn anything. This basic discussion on Revit user interface would be a stating for the beginners who wants build career in architectural design and BIM modeling. By familiarizing yourself with essential tools like the Application Menu, Quick Access Toolbar, Ribbon, Project Browser, and navigation methods such as zooming and panning, you’ll be well-equipped to create effective designs. Remember bookish knowledge is not enough; spend time exploring different features within Revit to enhance your skills further. Good luck.
If you need any services regarding the Revit BIM services,