
How to Calculate Area in AutoCAD? 2-Min Guide
- October 3, 2023
Do you ever look at your home, office, or any space, and wonder, “How much space is in there, exactly?” It’s a common curiosity, especially if you’re into architecture, interior design, or just passionate about precision. So, how to calculate area in AutoCAD?
Well, it’s time to satisfy that curiosity and supercharge your design skills with a simple yet powerful tool: calculating area in AutoCAD.
Now, you might be thinking, “AutoCAD? Isn’t that for professionals?” Fear not! In this user-friendly guide, we’re going to break down the art of calculating area in AutoCAD into bite-sized, easy-to-follow pieces.
Whether you’re a budding designer, an enthusiast, or just someone who loves exploring new skills, AutoCAD is your canvas, and we’re here to show you how to measure it.
Think of AutoCAD as your magic wand, ready to reveal the secrets of spaces, rooms, and landscapes. So, let’s embark on this exciting journey together, as we demystify the world of area calculations in AutoCAD, one step at a time!
Areas in AutoCAD:
AutoCAD isn’t just about making lines and curves. It’s like your digital math genius friend! Draw a shape, and it can instantly tell you the area inside it. Whether it’s a simple square room or a wacky, zig-zag design.
In AutoCAD, “areas” refer to the two-dimensional space enclosed within a boundary. Essentially, it’s the measure of how much space is inside a specific shape or boundary. The concept is fundamental in design and drafting because it helps professionals understand the magnitude of spaces you are working with.
Areas can represent various things depending on the context. In architectural plans, it might represent the floor space of a room. In a landscaping plan, it could represent the space taken up by a garden or a pond.
Also note, that the area’s value is usually presented in the square units of the drawing’s established unit setting. For instance, if you’re working in meters, the area would be represented in square meters (m²). So, how to calculate area in AutoCAD? We’ll figure it out today!
How to Calculate Area in AutoCAD
Don’t worry if you are a newbie or a pro, we have got you covered. Learn how to calculate area in AutoCAD with us.
Step 1: Start Your AutoCAD Program
First, start by opening your AutoCAD software. It’s like turning on your digital canvas. Whether you’re working on a pre-existing drawing or starting from scratch, it’s all good!
Step 2: The Drawing Board
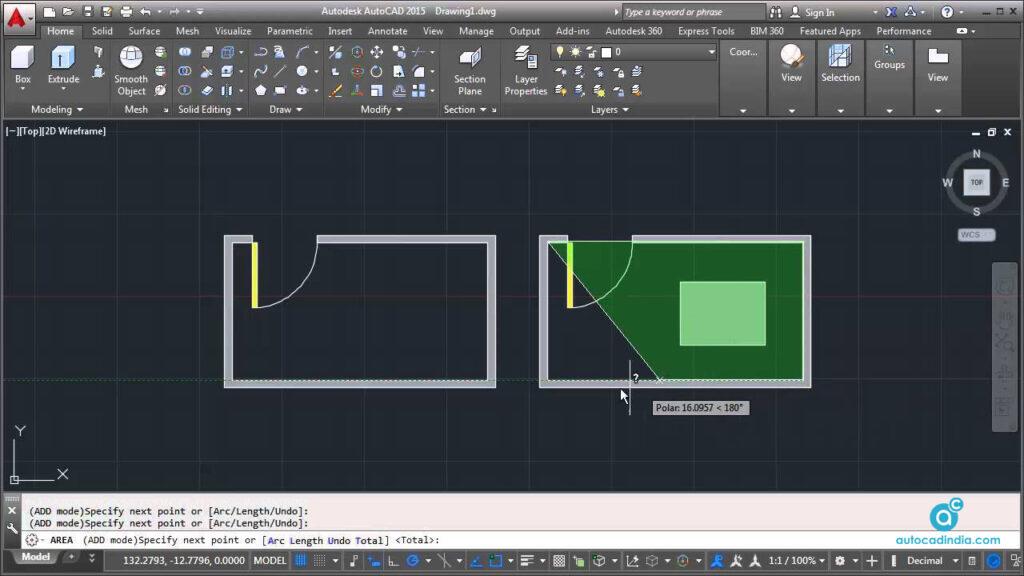
Before calculating any area, you need a shape! Have you drawn your boundary or shape yet? If not, now’s the time. Use tools like ‘LINE’ or ‘POLYLINE’ to sketch out the area you’re curious about. The key is to make sure all lines connect, forming a closed loop—think of it as drawing without lifting your pencil off the paper.
Step 3: The Area
See that bar at the bottom? That’s the Command Line. Here’s where we’ll chat with AutoCAD.
Type in “AREA” (you can also use just “A” if you’re feeling lazy) and press Enter. This is like asking AutoCAD, “Hey, can you help me find out how much space is inside this shape?”
4. Select Your Calculation Method:
AutoCAD is versatile and gives you a few methods to find your area:
Object: Got a complete shape? Choose this! After clicking ‘Object’, select your shape, and AutoCAD will do the math.
Add Area: Have multiple shapes? Use this to add their areas together.
Subtract Area: Need to remove a portion of the space, like a hole in the middle? This option’s for you.
Automatic: Just point and click around your shape. AutoCAD sums up the area as you go.
For simplicity, we’re focusing on the Object method today.
5. Choosing Your Object:
With ‘Object’ selected, go ahead and click on your closed shape. Wait for it… and voilà! AutoCAD spills the beans, revealing the area right in the Command Line.
Bonus Tips!
Here are some additional tips on how to calculate area in AutoCAD.
Units Matter: Before calculating, ensure you’ve told AutoCAD what unit you’re using (like inches, meters, etc.). It’s like telling it whether you’re thinking of cookies or pizza slices!
Encountering Gaps?: If AutoCAD isn’t giving an area, maybe there’s a tiny break in your boundary. The ‘POLYLINE’ tool can help you join them together.
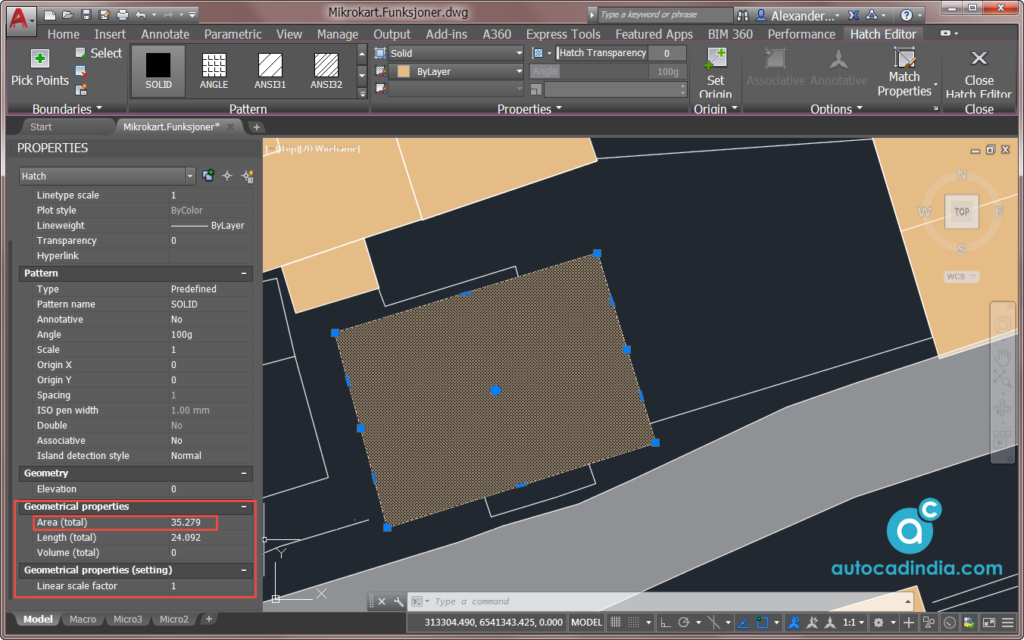
Want to Show Off?: Display the area right on your drawing with the ‘FIELD’ command. It creates a neat label, so you (or anyone else) can see the area without doing the math again.
In Summary,
And there you have it! Now, you know how to calculate area in AutoCAD, right?
The mystery of areas in AutoCAD is just for you. With a bit of practice, you’ll be measuring all kinds of spaces in no time. So, go on, play around, experiment, and most importantly, have fun with your newfound AutoCAD prowess
Do you need help with AutoCAD Projects? Please contact us for details.