CAD-CAM Mold Design Tips and Tricks for Optimal Results 2024
- December 22, 2023
CAD-CAM Mold design is super important for creating molds. As you know, CAD stands for Computer-Aided Design, and CAM stands for Computer-Aided Manufacturing. These are computer helpers who play a big role in designing molds, which are like templates for creating stuff. CAD-CAM Mold Design Tips and Tricks will help you get the optimal results you deserve.
Having a good mold design is crucial because it helps make really good products, saves money during production, and makes the whole-making process smoother. So, in this article, we’re going to look at some helpful tips and tricks for using CAD-CAM mold design. This will make sure you get the best results possible when creating things. Let’s dive in!
Cad-CAM Mold Design Tips and Tricks

We will write from scratch. To get the details of CAD-CAM mold design, first, you have to know the basics of material properties. Here it is,
What Are Material Properties?
Before you start designing a mold (which is like a template for making things), it’s super important to really know the material you’re going to use. Different materials act in different ways. Imagine each material having its personality!
Here are a few things to know about materials ideal in CAD-CAM Mold Design:
Shrinkage Rates:
Some materials shrink (get a bit smaller) when they cool down. Knowing how much they shrink helps in making the mold the right size.
Thermal Conductivity:
This is like how well a material handles heat. Some materials can take a lot of heat, while others might not do so well. Knowing this helps in designing a mold that can handle the temperature without any problems.
Flow Behavior:
Think of it like how the material moves when it’s turning from a liquid to a solid. Some materials flow easily for CAD-CAM mold design, while others are a bit more stubborn. Understanding this helps in designing the mold so that the material fills it properly.
Now, why is all of this important? Well, when you have the CAD-CAM mold design, you want to make sure the final thing you’re creating (let’s say a plastic part or something) turns out just right.
Knowing how the material behaves helps you design the mold in a way that gets you the exact thing you want, meeting all the requirements. It’s like making sure the mold and the material are a perfect match for creating the best product!
1) Use Parametric Design:

Parametric designs let you tweak specific things, or parameters, without causing chaos in the entire design.
This flexibility is super helpful because, in the real world of making things, plans often change. Maybe the product needs a little adjustment, or there’s a new requirement. With parametric design, you can quickly make these changes without starting from scratch. It’s like having a magic wand that lets you reshape your mold effortlessly.
Another cool thing about parametric design is that it makes teamwork smoother for CAD-CAM mold design. Imagine you’re working on this mold project with your friends. Parametric design lets everyone join in and make changes without stepping on each other’s toes. It’s like passing the building blocks around – each person can tweak their part without breaking the whole structure.
So, parametric design is like having a flexible and collaborative way of building things. It’s a real game-changer in the world of mold design, making it easier to adapt to changes and work together seamlessly.
2) Optimize Cooling Channel Layout:
Making sure the mold (the tool used to shape materials) stays cool is super important for it to work well. Imagine baking cookies – if the baking tray gets too hot or not hot enough, the cookies won’t turn out right. The same goes for making things with molds in a factory.
To make sure the mold stays at the right temperature, engineers use computer programs to simulate and plan where to put cooling channels. These channels are like tiny pipes that carry cool water to keep the mold from getting too hot. Think of it like a superhero’s suit – it needs to stay cool to work properly.
By using these computer programs, engineers can figure out the best spots to put these cooling channels. If they’re placed strategically, it can make the whole process faster and the final product better. It’s a bit like finding the best path for a race – if you take the right route, you’ll finish faster and do better.
There’s also something called “conformal cooling.” That’s like making sure the cooling channels follow the shape of the mold. It’s a bit like putting the cooling pipes exactly where they are needed, like fitting a glove perfectly. This way, everything cools down evenly, making sure each part of the mold gets just the right amount of cooling. It’s all about keeping things balanced and working smoothly.
3) Draft Angles and Wall Thickness:

Let’s divide the two separately,
Draft Angles:
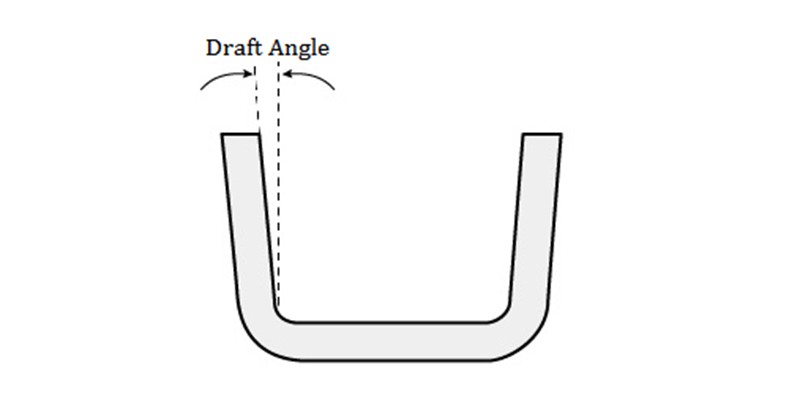
When we’re making things using molds, like plastic or metal parts, we need to think about how to take the finished product out of the mold easily. Imagine making a sandcastle and trying to take it out of the bucket. If the walls of the bucket are straight up and down, it’s hard to get the sandcastle out without it breaking.
In mold design, draft angles work the same way. They’re like a slight tilt or slant given to the walls of the mold. This tilt makes it much easier to remove the final product from the mold without damaging it. Think of it as the gentle slope on a slide that helps you come down smoothly. So, when designing a mold, it’s important to add these draft angles, and the amount of tilt depends on what material you’re using and the shape of the part you’re making.
Uniform Wall Thickness:
Imagine you’re building a tower with blocks. If some blocks are thicker than others, the tower might become unstable and wobbly. In mold design, we want the walls of the product to be of the same thickness all around. This consistency helps prevent issues like warping, where the material might bend or deform during the manufacturing process.
So, when designing a mold, we make sure that the walls of the product have the same thickness everywhere. This not only keeps the product in good shape but also improves how the mold works overall. It’s like making sure each layer of a cake is the same thickness – it bakes evenly, and the final result is better.
Draft angles help in taking the product out smoothly, like a slide, and uniform wall thickness ensures that the product is strong and doesn’t have any wobbly or uneven parts, just like building a sturdy tower with blocks. These are important things to consider when creating molds to make sure everything goes smoothly and the final product turns out just right.
4) Gate Placement and Design:
Ensuring that the opening, called the gate, where the liquid material enters the mold is in the right place is super important. This is because it affects how evenly the mold gets filled and lowers the chances of mistakes in the final product.
To figure out the best spot for this gate, we use computer simulations to watch how the hot, liquid material flows. By doing this, we can pick the perfect location for the gate and design it in a way that works best. There are different types of gates, like edge gates, submarine gates, and hot runner systems. Each type is good for different situations or products. It’s a bit like choosing the right door to enter a room – you want it in the best place for everything to work smoothly.
5) Consider Venting:

Venting is the air in the mold an escape route. It’s like opening a window to let fresh air in and the old air out. In mold design, having these escape routes for air is super important. If the air doesn’t have a way to get out, it can get trapped, and that’s bad for a few reasons.
Firstly, if the air is stuck in there, it can create burn marks on the toy when the plastic is heated and pressed. It’s like when you cook something on the stove, and it gets a bit too hot—similarly, the plastic can get damaged.
Secondly, if the air is stuck, it might not allow the plastic to fill the mold completely. It’s like trying to fill a cup with water, but there’s some air in there, so you can’t get as much water in. In mold design, we want the mold to be filled with melted plastic to make a perfect toy.
To make sure this doesn’t happen, designers create special pathways in the mold for the air to escape. These pathways are the vents. Just like you clean your room regularly, it’s important to check and clean these vents in the mold too. If they get clogged or blocked, they won’t work properly, and you might end up with toys that have defects.
Think of venting in mold design like making sure there’s a way for air to escape, just like you’d open a window to let fresh air into a room. It helps prevent problems like burn marks and ensures the mold gets filled to make perfect products. Keep those vents clean and clear, just like you keep your room tidy!
6) Simulate and Iterate:
Simulation tools are super helpful tools when using CAD-CAM mold design. Imagine them as virtual testing grounds where we can check how things will work before actually making them.
So, what we do is use these tools to carefully test and see how fast the material fills up the mold, what kind of pressure it experiences, and how the temperature is spread around. It’s a bit like a practice run but on the computer.
Now, the cool part is, if we notice any problems during these virtual tests—like maybe the material doesn’t fill up the mold properly or the pressure is too much—we can make changes to the design right there in the computer. It’s like fixing things before they even happen in real life.
By doing this kind of testing and tweaking, we make sure the mold works well when it’s actually used for making things. So, it’s like having a smart preview that helps us make the mold work as perfectly as possible.
7) Documentation and Collaboration:

When you’re designing something, like a mold, it’s really important to write down and keep track of everything you’re doing. This is what we mean by maintaining comprehensive documentation. It’s like having a detailed diary of your design journey.
Why It Matters:
Imagine you’re working with a team of people. Clear documentation, which is basically well-organized notes, helps everyone understand what’s going on. It’s like having a map that shows the way from the design phase (coming up with the mold idea) to the manufacturing phase (actually making the mold).
8) Stay Updated on Industry Trends:
CAD-CAM Mold Design trend is always changing, with new pieces and better ways to put them together. To stay on top of things, it’s important to keep up with the latest tools and tricks. Imagine you have a box of tools to build your puzzle, and sometimes there are new tools that make it easier or faster. Stay curious and learn about these new tools and ways of doing things.
It’s like always getting the newest and coolest puzzle pieces to make your puzzle the best it can be. So, by keeping an eye on what’s new and being willing to try out new tools and methods, you can make your mold designs stand out and be super innovative!
Conclusion:
In conclusion, CAD-CAM mold design is a multifaceted process that demands attention to detail and a deep understanding of materials and manufacturing processes. By incorporating the tips and tricks discussed in this article, you can enhance the efficiency of your mold designs, reduce production costs, and ultimately deliver high-quality products.
Stay committed to continuous improvement, embrace new technologies, and foster collaboration within your team to ensure success in the ever-evolving world of mold design. For help! Feel free to get in touch with us!
