How to Change Color of Dimensions in AutoCAD [2023]
- August 9, 2022
When drafters work on a large-scale 2D/3D project in AutoCAD, an AutoCAD change dimension color is a MUST. Different dimension colors add consistency to your project. There always lies a possibility to deliver a messy project if you miss out on changing the color of dimensions in AutoCAD.
However, with the pressure to complete a perfect AutoCAD design on time, it’s not always possible to think straight. Hence, minor issues like changing AutoCAD dimension color or text color can be time-consuming without a quick solution.
Moreover, browsing in the wrong places for the right solution will only make it worse. To help you have an effective solution in order to change AutoCAD dimension color and know more about it, today, we are here for you.
Read more: 10 Best 3D Modeling Software Free
How to Change Color of Dimension in AutoCAD:
Changing the dimension color in AutoCAD is easy. You can have AutoCAD change dimension color in two different ways.
1) Manual Access to DSM (Dimension Style Manager)
2) Using Command Box
Here, we will describe two different methods separately for better convenience and easy selection.
Manual Access to DSM (Dimension Style Manager):
If you want to explore through the administration panel of AutoCAD, feel free to choose this method. It is simple and promotes a general learning method, saving you some memory to store commands.
Follow these simple steps to manual changes to the dimension style manager.
Step 1: Start with Annotate Tab

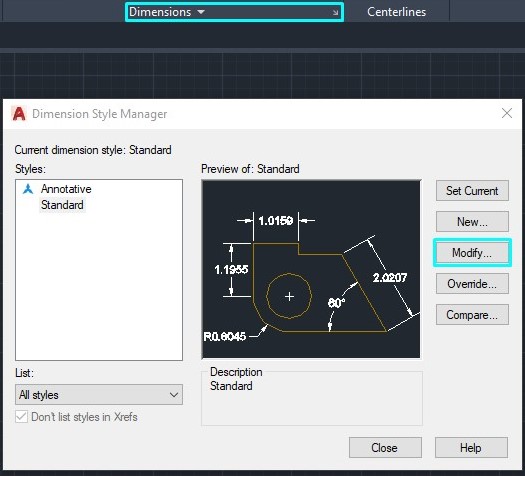
To alter AutoCAD change dimension color, you need to access the Dimension Style Manager. To access this dialog box, go to Annotate Tab.
Under the dimension section, you can see a small arrow on its bottom left. Click on it to enter the DSM.
Step 2: Modify Dimension Style

Once you have entered the Dimension Style Manager Box, you can see all the available styles under the Style section.
However, to bring specific changes to Dimension color and other parameters, click on the “Modify”
Step 3: Use the Lines Tab
Once you have entered the Dimension Style Manager Box, you can see all the available styles under the Style section.
However, to bring specific changes to Dimension color and other parameters, click on the “Modify”
Step 3: Use the Lines Tab
Under the Lines tab, you will see a section “Dimension Lines” here. Here, you will see several options to modify the dimension lines of your AutoCAD design.
Click on the “Color” box and you will have multiple color options to choose from. You can also set up a personal color mode for any dimension line here. Once you have changed to your desired color, click “OK” to save the changes.
You can also change “line type” and line weights along with the extension lines from here as well.
Note: By making any changes in the “Modify Dimension Style: Standard” you can see relevant changes to the demo design. This process makes it easier to get used to the modifications.
Using Command Box to AutoCAD Change Dimension Color
To ensure quick solutions and successful implementation of large-scale projects, AutoDesk inserted the Command Bar for users. From here, users can get access to any kind of tool to enhance their design without having to spend so much time crawling within the toolbar.
From here, you can have shortcut access to Dimension Style Manager as well. Here is what you need to do:
Go to the Command Bar of your AutoCAD software. I am using AutoCAD 2022 where the command bar is located below the sheet.
Type “DDIM” there and press “Enter” from your keyboard. By doing so, the dimension style manager will immediately pop up before your window.
However, you can check on previously used command lines from here as well. Just take help from the right bottom scroll-up option of the command bar.
Frequently Asked Questions (FAQ):
Why is dimension in AutoCAD important?
While drawing any BIM structures, it is crucial to add the right measurements. These measurements and dimensions will be later used to set up the project in real life. You can develop an electrical design or architectural model. But inserting the correct dimension is an extremely crucial part.
Many AutoCAD users use scaling factors to simplify similar features and eliminate any confusion. This also comes in very handy for those who will follow the design to work accordingly. In a word, any AutoCAD design is meaningless if there are no dimensions mentioned. Both the drawing itself and the dimension are equally important to carry out the project successfully.
What are the parts of dimensions in AutoCAD?
Dimension in AutoCAD has 4 different parts. They are:
- Dimension line: Dimension lines in AutoCAD indicate direction and its expansion.
- Dimension text: It is usually a value that indicates measurement in number. However, it can be prefixes, suffixes, and tolerances as well.
- Extension line: These are the parts of dimension lines that lie between the model itself and the dimension line. Extension lines are also called projection lines.
- Arrowhead: Arrowheads are usually used as tick marks and they are located at the end of each dimension line. You can change their shapes and style based on your requirements.
What are the two types of dimensions?
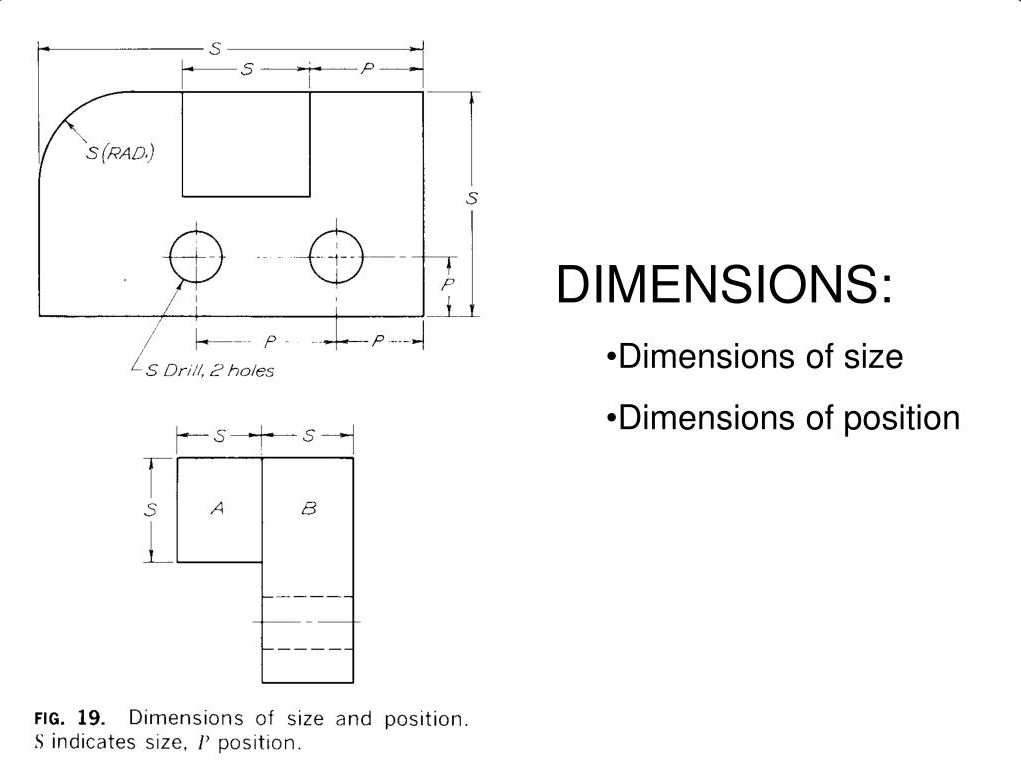
There are two types of AutoCAD dimensions. In fact, they are applicable for any kind of drawing. These two dimensions are the size dimension and position dimension. Size dimension indicates the size of any attributes and objects. And position dimension locates any attributes and objects.

Final Words
AutoCAD, being one of the most user-friendly applications, serves millions of users all over the world. However, despite its ease of use and simplicity, you can still find yourself in trouble given the number of project loads.
Hence, keeping both methods of AutoCAD change dimension color in mind can help you in your darkest times. 😀 Our article provides an easy solution to a simple problem. However, if you still find yourself in trouble with different tools of AutoCAD, feel free to contact our professional craftsmen here at AutoCAD India.
